WE SOLD OUR TRUCK AND CAMPER
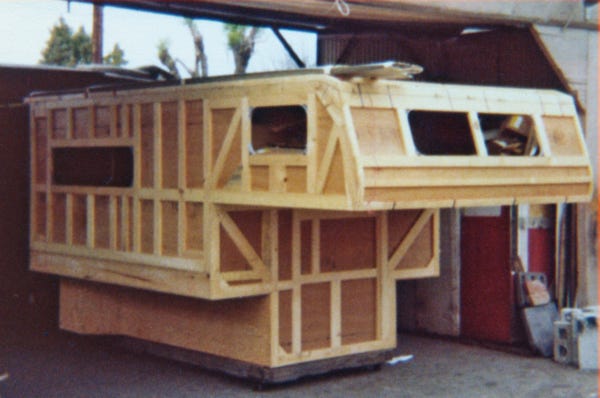
1980 CUSTOM-BUILT CAMPER WITH A CLASSIC CUSTOM
1979 FORD F-350 LARITE CAMPER SPECIAL TRUCK
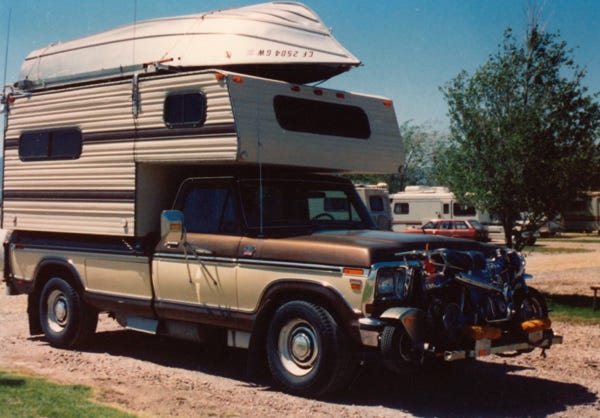
When we ordered our 1979 Ford F-350 truck, we knew that we needed a powerful 460 cu. in. motor with a strong transmission to tow our 34-foot trailer. A year before retiring we went to RV shows and decided on a 34-foot Silver Streak trailer to be our home on wheels. As we planned for our retirement in 1980, we knew that we wanted an 8-foot cabover camper to mount on our 1-ton truck.
We designed the camper and drew up the plans for a one-of-a-kind camper that is truly original. We found a custom RV shop in Glendale, California who looked at our plans and said that he needed at least 6 months to build our camper. As construction began on our camper, we also ordered our 15-foot Gregor H-51L boat with a Johnson 25-hp long shaft motor.
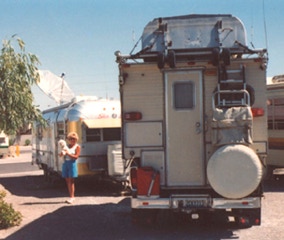
As you can see by the photo above, we needed a powerful motor to lift the boat on top of the camper and installed an Edie boat loader with a 12-volt motor. In the front of the truck, you will see our Honda Trail 70 motorbike and parts of a collapsible boat trailer. When we assembled the boat trailer, we then unloaded the boat onto the trailer and could tow it up to 50 mph on the highway. We sold the collapsible boat trailer, and our Gregor boat a few years ago.
ALL ABOUT OUR CLASSIC-CUSTOM 1979 FORD F-350 TRUCK
The truck is a 1979 Ford F-350 Larite with the camper special package. It has a Class V hitch for towing a large trailer, and front, and rear mud flaps. The truck and camper have a burglar alarm system, and every door and compartment is wired with a sensor to protect the valuables stored inside.
In the bed of the truck along the sides by the wheel wells, we built wooden cabinets that line up to the cabinet doors in the camper for dust-free storage. All of the campers made today have a cabinet door that will open to the bed of the truck, but this area is not sealed from the elements, and any items stored there will get dirty. With our dustproof cabinets in place, all items stored will be dust-free.
The truck has a tachometer, vacuum gauge, oil pressure gauge, coolant gauge, compass, altimeter, automatic electric brake controller, and variable resistor, these were added by us. Also, we have a Cobra 40-channel CB with dual antennas and fog lights. We have added two Carter racing electric fuel pumps, one for each gas tank along with a Holley Fuel Pressure Regulator.
It has a straight bench seat in the front, and we have added a special storage box over the hump where the transmission is. This box is about 28” deep x 14” wide x 12” high. In the box is where the burglar alarm sensor is stored and other miscellaneous items. The lid of the box is flat with a plastic tray for coffee mugs and a Radio Shack FM booster for the radio. We replaced the Ford factory radio with an AM/FM, Cassette radio.
Behind the bench seat is a large storage box that we built to hold spare parts, a hydraulic jack, battery cables, a complete set of Ford manuals for the truck, flares, and much more.
We took off the small engine oil cooler and added an extra heavy-duty large oil cooler by Mesa. We also added a heavy-duty large transmission oil cooler as well as a power steering cooler. We also replaced the 70 amp alternator with a heavy-duty 120 amp alternator.
We changed the front tires to match the rear tires when the truck was just a year old because we did not want to carry two spares, and we wanted the stability that the 12x16.5 12-ply tires gave. These are Goodyear Custom Hi-Miler Bias Ply tires, and we have never had a blowout or tread separation.
The standard air cleaner has been replaced with the K & N oiled air filter system. With this system, you get more air into the carburetor, and you can wash the filter with a special cleaner, and then re-oil the filter, let it dry for 20 minutes, and install it. The filter lasts indefinitely.
Over the years, we have maintained the truck and have replaced many items such as a Modine 4-core heavy-duty radiator, a Ford starter motor, a power steering gearbox, a power steering pump, belts, hoses, air conditioner serviced, and many other items to much to list.
Several years ago we had the motor rebuilt by an excellent shop in Yuma, Arizona. He is well known in our area for rebuilding motors for racing cars, racing boats, and stock engines. He was recommended to us by an employee who works at the local Ford agency!
Our engine was still strong and running very well, and not using any oil, and we did not have any major or minor problems, but at 160,000 miles we decided to have our engine gone through completely. We did not want to be off somewhere traveling in an area where we did not know anything about the garages that we decided while in Yuma to have our motor gone through. Ralph bored the pistons slightly, they did not need much, and put in hardened valve seats, and all top-of-the-line components. He put in a new camshaft by Schneider, double roller Eldebrock timing chain, flywheel, and all the other parts to make this a 100% job. He tuned the engine to our specifications for our towing requirements. Another shop installed the engine, and we replaced the water pump, oil pump, and many other items too much to list.
A year later we rebuilt the transmission, the Ford C-6 which is an excellent transmission. Again, the shop we picked in Yuma was highly recommended and they did an excellent job.
We have a total of 248,000 on the truck, 86,000 on the rebuilt motor, and 65,000 on the rebuilt transmission. You may think that this is a lot, but we never worry about the truck since we know that it has all been maintained regularly, it does not use any oil, and it has been a great performer. We have kept a list of all repairs along with the cost to show that it has been maintained regularly.
Several years ago we replaced the Holley carburetor with a new Holley 4-barrel carburetor. One thing about the older engines is that you can work on them yourself when you are traveling to out-of-the-way places such as Mexico, Alaska, and remote areas in Canada; you can always find a shop that can work on them. The new motors are all computerized, and you usually have to go to the dealers to have any work done. You can’t even replace the belts on the new vehicles where ours you can.
We have extra spare parts for the truck including a new 60 amp alternator, starter motor, coil, belts, radiator hoses, fuses, bulbs, motor oil, lube, and much much more.
This has given you the highlights, but there is still so much more that we have done to make this unit a one-of-a-kind.
ALL ABOUT OUR CUSTOM BUILT CAMPER
Our camper was custom-designed by us, and we had it built by an RV shop in Glendale, California. It is an 8-foot, 1980 cab over camper.
The construction is a wood frame with fiberglass and Styrofoam insulation. The roof is a sandwich construction with a solid wood roof with Styrofoam between the two pieces of wood and paneling. We did this because we wanted a solid roof construction to support the 15-foot cartop boat. The floor is also sandwich construction with linoleum, and we have added a foam carpet pad and rust-colored carpeting.
We have included dishes, pots, pans, and silverware. Also, towels, blankets, and sheets. We have many extra RV parts for the camper and truck, too much to list here.
We have a large overhead queen-sized bed with an excellent five-inch foam mattress and an egg crate foam pad on top. There is a 12-volt fan in the corner at the foot of the bed as well as a smoke alarm, a carbon monoxide detector, a reading light, and a switch that can be pulled to make the burglar alarm go off instantly.
All of the windows are made by Hehr and are tinted a dark bronze color. We also have made up for each window Plexiglas storm window that can be easily removed.
We replaced the refrigerator, porta potty, water pump, and furnace motor. We took out our old roof vents and replaced them with a new Fantastic thermostatically controlled fan in the living quarters and a regular Fantastic vent in the overhead bed area. We have a three-burner stove top, a single sink, and an Everpure water filtration system with an accumulator tank that keeps the pump from running continuously.
We have a Panasonic AM/FM cassette radio with two speakers in the kitchen area. Two wardrobe closets and several large storage compartments for all of our gear. We have overhead cabinets above the kitchen table as well as above the kitchen sink area and the refrigerator. The cabinet above the kitchen sink area has a solar panel controller with an on/off switch. Also, in this cabinet is the 20 amp circuit breaker box. We have a propane detector and fire extinguisher.
We also have an 8-foot-long fishing pole compartment that can be accessed from inside of the camper as well as from the outside compartment door. We stored four pairs of snow skis and poles in this area when we went snow skiing in Colorado. We have a very large compartment under the dinette seat that provides excellent storage.
We have an indoor/outdoor temperature gauge for the camper as well as another one to monitor the refrigerator. Three Thin-lites provide excellent lighting inside, and we have a porch light as well as six outside scare lights to light up the area at night. Also, a separate spotlight for more additional lighting at night.
It is wired for local TV with an outside antenna with a 12-volt booster to boost the local antenna signal, as well as a crank-up Winegard DSS Satellite antenna, a Sony Satellite Receiver, and a nine-inch color TV.
Under the refrigerator is the cabinet that holds the 12-volt water pump by Shurflo as well as the 1000-watt Heart Interface Inverter, 20 amp power cord, and a 12-volt switch that operates the 12-volt pump mounted on the truck frame to transfer water from the extra 15-gallon water tank to the camper tank. We have added a 12-volt switch that is an automatic ignitor for the operation of the refrigerator in gas mode.
The burglar alarm is wired to protect all compartments and the rear door of the camper as well as the truck. There is a separate switch in the wardrobe compartment that can be turned off so that when the alarm is set, and you’re inside the camper; you can turn this switch off to exit the camper without the alarm going off. Such as, if you want to walk the dog, etc. Then when you enter the camper, you just flip the switch back to the on position, and the rear door is protected by the alarm.
On the roof is a large Kyocera KC-80-watt solar panel that can put up to 3 amps at 17 volts per hour in the camper’s large deep-cycle battery. The camper battery is a deep cycle one, larger than a traditional group 27 battery, gives more power, and is better for large solar panels. Both the camper battery and truck batteries are new.
The Edie boat loader uses 12-volt power to power the motor to lift the 15-foot boat up and down. When the boat is unloaded, the ropes then move back into the stored position. The remote control power cable is stored in the wardrobe closet. The value of the Edie loader is over $1000.00.
On the rear of the camper above the door and the right-hand side of the camper is an awning rail. The awning slides into the rail, and with two telescopic poles can be adjusted to the proper height. This awning can go in either place, depending on where you want the shade.
The portable shower mounts on the left-hand side with the PVC tube and then hangs in place. The solar shower bag is then lifted into place with the rope and tackle assembly and hangs in the shower room. For additional water, you can hook up the handheld shower to the rear of the camper’s hose bib and use the camper’s 12-volt pump to have a cool shower.
Above the spare tire is an 8-foot folding heavy-duty ladder, it mounts permanently on brackets and it is locked with a paddle lock and chain. We use this ladder when we unload the boat or have to get on the camper or trailer roof's to clean the solar panels. Also, hanging on the ladder are brackets to store two folding chairs in a vinyl bag.
The large compartment behind the spare tire holds the 25 hp Johnson long shaft motor. The shelf in this compartment is removable so that the motor can slide into place. First, unlock the spare tire and rotate the tire to the right, then unlock the compartment door.
Then load in the motor and slide it in until it stops, then take the seat belt clips and fasten together, one over the shaft of the motor and the other going across the motor head. This keeps the motor in place so it won’t slide around. We have found that we can both carry the motor and lift it into the compartment, or you can use a deer hoist and wrap it around the motor head and clip it on the large eye bolt just under the roof of the camper. We have used this system but find that it is more awkward than just lifting the motor in place.
Then, the anchors and chain go on each side of the motor, the black rubber motor transom protector lies over the top of the motor head, the spare white poly anchor ropes fit around the back of the motor head by the shaft, the gasoline tank hose is in a plastic bag and lies on top of the motor head. Other miscellaneous gear fits around the motor, front, rear, and sides in this compartment.
When this area is full of all of our gear, we then put in the two-piece shelf with the larger piece in first and the smaller piece in second towards the front. Then, we put in the piece of brown carpet. The boat’s battery box goes on the left side, and we use the white strap that keeps the cover on to slip it into the plastic holder at the rear of the compartment, and then over the battery box so that the battery will not move. Then, we have additional boat gear in cardboard boxes that fit on the shelf along with boat oil and other miscellaneous gear.
Then, we lock the compartment rotate the spare tire into place, and put in the locking pin and paddle lock, and then the paddle lock through the hole of the bracket. Then, the board slips under the tire to support it.
The metal-lined compartment above the propane tank is for the 6-gallon boat gas tank. We usually put it in the gas tank and then all of our spare bottles of motor oil, and lube go around the gas tank.
The small access door above the motor compartment is for fishing poles, sunshade poles, snow skis, or any long items.
When you lift down the rear step of the camper, the opening between the truck body and the bumper is for level blocks; it will hold six level blocks. Also, included are two sets of brown tire covers for the truck, a green drain hose for the grey water, and a full windshield cover.
On the right side of the truck body is a removable metal door, behind this door is a 30-gallon holding tank to hold waste from the trailer tank. With a macerator pump, you can pump out the trailer tanks into this 30-gallon tank and drive off to a dump station.
The vent for this tank is located at the top of the tank on the right, and you have to reach in and turn the valve to vent this tank so that it will not crack because of the pressure of the liquid when filling the tank, we usually leave this open just in case we forget to open it. It does not hurt to leave this open as a safety measure. The garden hose fitting is at the rear of the tank towards the top, just remove the metal cap, and then connect the end of a garden hose from the macerator to this fitting, then the macerator can be put on to pump out the trailer tanks. The sewer hose for this tank is located in the white PVC tube above the rear tire in the wheel well area.
Also, in this area are extra drain hoses and a water hose. Mounted in front of the plastic tank in this compartment is a 12-volt Sears Wireless Remote Control Winch with 11,000 pounds rolling load capacity, and 3,500 pounds single line pull with a mounting bracket, and the wiring is in the compartment under the dinette seat. The value of this winch is over $400.00 and is included in the price.
The white plastic 8-gallon tank under the right door is now used as an extra water tank for the camper. We originally had this hooked up for a water injector system made by Eldebrock for the motor but now find that we don’t need it anymore. It was used to help control ping because of bad gas.
The green toggle switch under the dash on the left-hand side is for the 12-volt pump to pump water from this tank into the camper. We first take the small white plastic hose coiled under the hood on the left side string it out and place the end into the camper water fill spout, turn on the green toggle switch, and the water is then taken from this tank to the camper water tank.
Also, under the right door is a black shelf with a portable BBQ. Just remove the nuts from the bolts and slip off the two metal straps and the shelf lowers down and the BBQ slides out. Put back the two straps and nuts and the shelf is now secure.
Under the left door is a 12-gallon holding tank for the camper, it has a separate 12-volt bilge pump that hooks to the garden faucet fitting and to the power wires stored in the 20 amp power cord compartment. With the two wires, a positive and a negative hook to the pump, the pump starts and pumps the wastewater through the PVC pipe that is under the truck frame that goes over to the 30-gallon holding tank.
Behind the left door side, there is a 15-gallon fresh water tank. The white fill hose is under the overhang part of the camper by the freshwater fill spout. Just remove the brass cap and put a water source to this hose and it will fill the tank. When you want to get the water transferred to the inside camper tank, you just take the other white hose that is tied up under the camper overhang by the fill spout put on a short piece of fill hose to the fill spout and then open up the compartment door that the power wires and 20 amp power cord are in and you will see a 12-volt toggle switch. You must first be sure to open the valve that is at the bottom of the tank so that the water will flow up to the fill hose, then turn the switch on and the water will be pumped up and into the freshwater tank. We have added a Shurflo 12-volt water pump mounted under the truck frame area to use to pump the water from this tank to the camper tank.
Mounted in the left wheel well is a snow shovel that we have carried with us for many years. On the rear bumper is a bracket for a 5-gallon G.I. gas tank for extra gas for the truck or boat.